What Actually Happens During a Full Aircon Chemical Overhaul
A chemical overhaul is the deepest aircon clean possible without replacing parts. Here's exactly what happens, step by step, when we dismantle, clean, and rebuild your fan coil.
A full aircon chemical overhaul is the most thorough cleaning you can give a fan coil without replacing parts. It takes more time than a wash, costs more than a wash, and reaches places no surface clean can. Here’s the full sequence, step by step. If you’re still unsure whether your unit needs an overhaul or just a wash, read our wash vs overhaul comparison first.
Step 1: Isolate the unit and prep the workspace
Power off at the wall switch and the breaker box. Confirm with a multimeter that no voltage is present at the unit. Lay tarpaulin sheets across the floor below the unit and a 2-metre radius around it. Cover any furniture in the splash zone.
Time: 10 minutes.
Step 2: Remove the front panel, filter, and louvre
The front panel is held by a few clips and one or two screws. The filter slides out. The louvre vane assembly disconnects from the motor shaft after one screw is removed.
These three pieces are set aside on the tarpaulin.
Time: 10 minutes.
Step 3: Dismantle the fan coil from the wall
The fan coil is held to the wall by a metal mounting bracket. With the panel and louvre removed, we can see the bracket clips that hold the coil in place. The coil lifts off the bracket vertically.
Most modern fan coils can be dismantled without disconnecting the refrigerant lines — there’s just enough flex in the copper to lift the coil clear and rest it on a working surface (usually a small folding table on the tarpaulin).
If the refrigerant lines need to be disconnected (rare, only for very tight installations), we recover the refrigerant first using a recovery machine.
Time: 20 minutes.
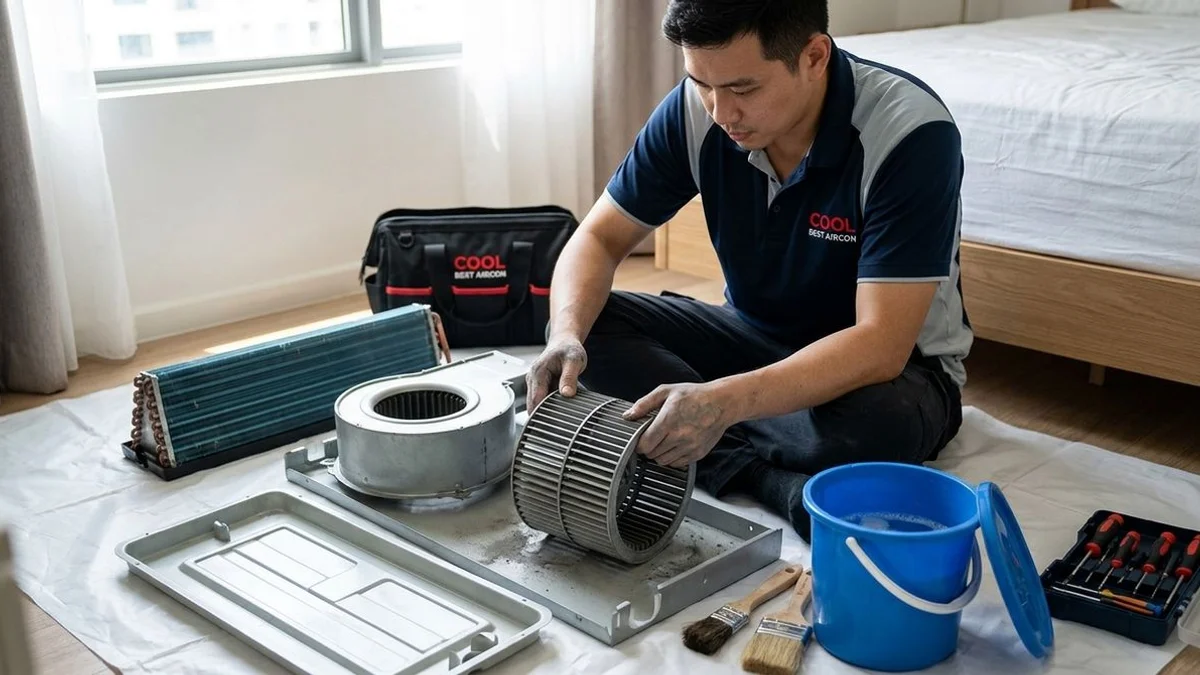
Step 4: Separate the components
With the fan coil on the work surface, we separate:
- The drain pan (the U-shaped tray under the coil)
- The blower wheel (the squirrel-cage barrel)
- The evaporator coil (the fin block)
- The casing and motor housing
Each component is laid out on the tarpaulin in the order it came off, so reassembly is methodical.
Time: 15 minutes.
Step 5: Chemical soak
Each component (except the motor housing — that’s wiped, not soaked) goes into a tub of approved aircon chemical solution. The solution is alkaline-based, formulated to dissolve biofilm without etching aluminium.
Soak time: 45 minutes. We use this time to start prep on the next fan coil if there are multiple in the home.
Step 6: Brush, rinse, and air-dry
After the soak, each part is brushed (soft-bristle for fins, stiffer for blower vanes), rinsed thoroughly with clean water, and laid out to air-dry on a clean section of tarpaulin. The drying step matters — assembling damp parts traps moisture and accelerates new biofilm growth.
Time: 30 minutes including drying.
Step 7: Drain pipe pressure flush
While the components dry, we flush the drain pipe end-to-end with pressurised water. The drain pipe runs from where the drain pan was mounted, through the wall, to either an external outlet or a condensate pump.
We test the flow at the outlet to confirm a clear, free-flowing discharge before reassembly.
Time: 20 minutes.
Step 8: Anti-bacterial treatment
Once the components are dry, we apply an anti-bacterial spray to the evaporator coil, the inside of the casing, and the drain pan. This step inhibits new biofilm growth and gives the unit a longer “fresh smell” interval after the overhaul.
Time: 10 minutes.
Step 9: Reassembly
Reassembly happens in reverse order of dismantling:
- Drain pan refitted
- Evaporator coil refitted
- Blower wheel reattached
- Casing closed
- Fan coil refitted to the wall bracket
- Louvre reattached
- Filter slotted in
- Front panel clipped on
Time: 30 minutes.
Step 10: Pressure test (only if refrigerant lines were opened)
If the refrigerant lines were disconnected in Step 3 (rare), we run a vacuum + pressure test before recharging refrigerant. The vacuum pulls air and moisture out of the lines; the pressure test confirms no leaks at the joints.
Time: 30 minutes (when needed).
Step 11: First-run cold-air verification
Power restored at the breaker, unit set to maximum cooling, 5-minute warm-up. Supply air temperature measured at the louvre with a probe thermometer. A healthy overhauled unit produces 12°C supply air at a 23°C setpoint within 15 minutes of switch-on.
Time: 15 minutes.
Step 12: Sign-off
Photo report compiled (if requested). Warranty card filled out with the date, the unit serviced, the work performed, and the 90-day expiry. You sign, we leave one copy with you, and the team packs up.
Time: 10 minutes.
Total time per unit
Around 2–3 hours per fan coil end-to-end. A 4-unit HDB flat overhaul typically takes a full day with two technicians.
What you should notice the next day
A properly overhauled unit should:
- Cool faster (15–25 minutes to reach 23°C setpoint)
- Smell neutral on switch-on (no musty undertone)
- Run quieter (clean blower = less imbalance)
- Drain quietly (no gurgling at the drain outlet)
If anything feels off in the first 90 days, message us — that’s what the warranty is for.